WARNING: The following post contains images of a checked-pattern nature. Staring too long at the images might make your eyes go funny
 Before the mapping can be reworked to allow a custom texture to be placed onto it, the first step is to kick start an 'Unwrap UVW' in the modifier port just above the edit poly modifier: It's important for the unwrap to be below the 'symmetry' and 'turbosmooth' modifiers. On the mini drop-down menu on the Unwrap UVW (The little black box with the '+' sign), select 'faces' and then change the selection to 'paint' (Top toolbar, the square with dotted lines around it. Left click and hold, then go down to the bottom one: A moving circle with dotted lines around it). Then it's simply a case of painting the entire head except the ear (The ear is handled separately as it's a complicated shape). Careful attention needs to be paid to this bit, as missing out a single face can ruin the map). With this done, 'cylinder' is selected in the modifier panel (Applying a cylindrical style map to the head) and is subsequently aligned so that it is vertical and the curved face goes around the front and back of the head ('Align Y' should do it). From here, it was a simple case of moving and rescaling the new cylindrical guide so that it was centred in the middle and contained the entire head (Including both sides) within it. From here, we slap on a 'checkered' pattern to get an idea of how everything was held together...
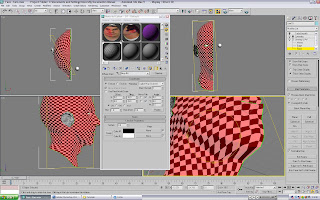
 As you can see in the above images, the squares are stretched on the top of the head and under the chin. Other than that, the squares are actually quite even over the rest of the head, which is a very good sign! Even over troublesome places like around the eyes and nose, it's very consistent. This means that very little will need editing.
 Clicking the large 'Edit' button in the modifier panel takes us here. Clicking the little triangle under the image and to the right removes unselected faces, which basically removes the ear from the picture. It's also important to deselect 'tile bitmap' and enable 'constant update' if they aren't done so already. This mesh of white lines is the map, and is a 2D rendition of how the texture is applied to the face. Each quad on the image is one of the faces on the finished model. From here, you can see why the top and the chin are so stretched: what is meant to be a small quad is an incredibly stretched rectangle. Time to fix it!
 Starting with the top of the head, the troublesome vertices were all selected (As well as a few neighbouring ones to ensure that any changes create an even transition to the original pattern), and then under 'Tools', the 'relax' tool was selected. What this little beauty does is space out the selected vertices from each other (depending on the parameters you give it). It also helps to even them out to create a consistent spread of the pattern. Now that's a time-saver! Making sure that 'relax by edge angles' was enabled, I simply 'hit' apply and that was pretty much it. The top of the head was suddenly evened out. There were a few stray stretches, but that was tackled manually by selecting the vertex and moving it around myself. The same was applied to the chin. All taken care of in under a minute. Nice.
 As you can see here, the nose was a bit of a mess. Many of the faces were overlapping, or were twisted in such a way that the pattern was inverted onto the back of the mesh. Both of these are undesirable and need removing. (You can locate any of these under the 'select' option). Luckily this was made easy with the relax tool again. This time, the mode was 'relax by centres', which basically moves them so they do not overlap. One click and the nose was fixed instantly. Now that's awesome!
 A few more tweaks later, and this is the finished result. All spaced and all even. Now for the ear!
 As before, the desired selection was highlighted with the brush tool. Luckily, the green lines of the previous map were still present (Which are basically the edges of the map), so it was easy to find which parts have been mapped and which weren't. Note to others: Take great care to select every bit of the ear, as it's easy to miss out a hidden face or 2. When you click the 'edit' panel, make sure you deselect the 'hide unselected' and look for any ear faces unselected. If one comes up, go back and find it. With the selection complete, we start with the 'planar' map, which is set so that it forms a nice square around the ear (You might need to hit align if it faces the wrong way. Again: Y worked for me)
 With the plane now in the right place, the next step was to select 'pelt'. This map is great for complicated structures which have a lot of overlapping parts and grooves. What it basically does is pull out the map, stretching all the edges out, hopefully spreading them all apart and removing any overlapping/inverted faces. However, in its current form, it'd be hard to stretch out the ear map properly. So before it's pulled, it's a good idea to create a 'seam' or 2 (It allows the edges to be pulled apart). I followed the tutorial, which suggests one behind the ear, shown above, and it was sufficient for the job.
 This is what the pelt looks like. You can find this by clicking 'Edit Pelt Map'. Despite a large number of options, all you need to do is use the 'scale' and 'rotate' tool on the pelt handles (The vertices on the outside blue ring), just to make sure you have a lot of space and that the majority of the lines are straight (You ideally don't want the red/grey lines pulling the edges out at an angle). All you do then is hit 'Simulate Pelt Pulling' and...
 There we go! All done. You might need to use the 'relax' tool and simulate pulling a few more times (You can keep pulling the mesh if you're not happy with the first result)
 And there we go! A pretty consistent pattern if you ask me. Aside from a few stretched bits in the centre, the rest of it has come out very cleanly
 We finish by going into 'Edit' mode again, and removing any inverted/overlapping faces. We also place the ear on a suitable space in the pattern (There's probably a nice bit of room in the corner under the place where the neck curves round). Rescale it down and hide it there. Result! Now to mirror it...
 Going back up a step and applying the 'Symmetry' modifier, we apply another 'Unwrap UVW' modifier to the head (But still keeping it below the 'turbosmooth'). Opening edit mode again, we have the same mesh as before... only now everything has been cloned (What's happening here is that the other half is using the exact same references, meaning it's in the exact same place). Enabling 'select element', we select the main face until we get the left side of the face (You can see it selected in the viewport). Once selected, mirror it and move it to the other side, placing it so that it just about touches the original (To help accuracy: Left click and hold over the 'move' button and select the one that's just left-right, which ensures that the second map stays perfectly level with the first). Do the same for the left ear
 The final step is simply to connect the central line of vertices together! Match each vertex on the central line with it's counterpart on the other side, and selecting both: Hit 'Ctrl + W' to weld them together. If they're slightly off centre due to the 'relax' tool earlier, just move them closer and weld them. With the 2 sides welded together, we now have a full mesh that we can work with in Photoshop to build the texture!
No comments:
Post a Comment