Friday 4 December 2009

Final Thoughts & Evalutation

Though there's still a little under a week left before the presentation and final deadline, the majority of the work has now been completed. The only tasks left are to format the videos and add the sound. In effect, the majority of my work here is now done, aside from lending a hand with the narration if it needs re-recording. So it's time to sit back, make a cuppa and reflect on a pretty intense few weeks...


I'm glad to say that it has been an absolute pleasure working with the group. I admit, I entered the group-phase with a slight sense of cynicism. I'd never really worked with a skilled group before, and always ended up picking up the slack... however, I'm glad to say that this was not the case here, not even remotely. I was privileged to work with a dedicated and exceptionally skilled team, who not only excelled in what they did, but equally encouraged me to strive for perfection and a high quality of work.


Anyway, it'd be bad taste for the others to brag about their abilities, so I'm going to do it for them:


Lee's confidence and natural sense of leadership make him the ideal front-man for the group. He was organised and kept us all up to date in the loop. At no point did I feel as if I wasn't being kept informed of the latest changes or new plans. The meetings were consistent and everyone was always kept updated. In addition to the majority of the paperwork, presentations and sound production, Lee also took on the train motion-side of the animation, and modelled the tracks and tunnel. The skilled Jack-of-All-Trades of our group.


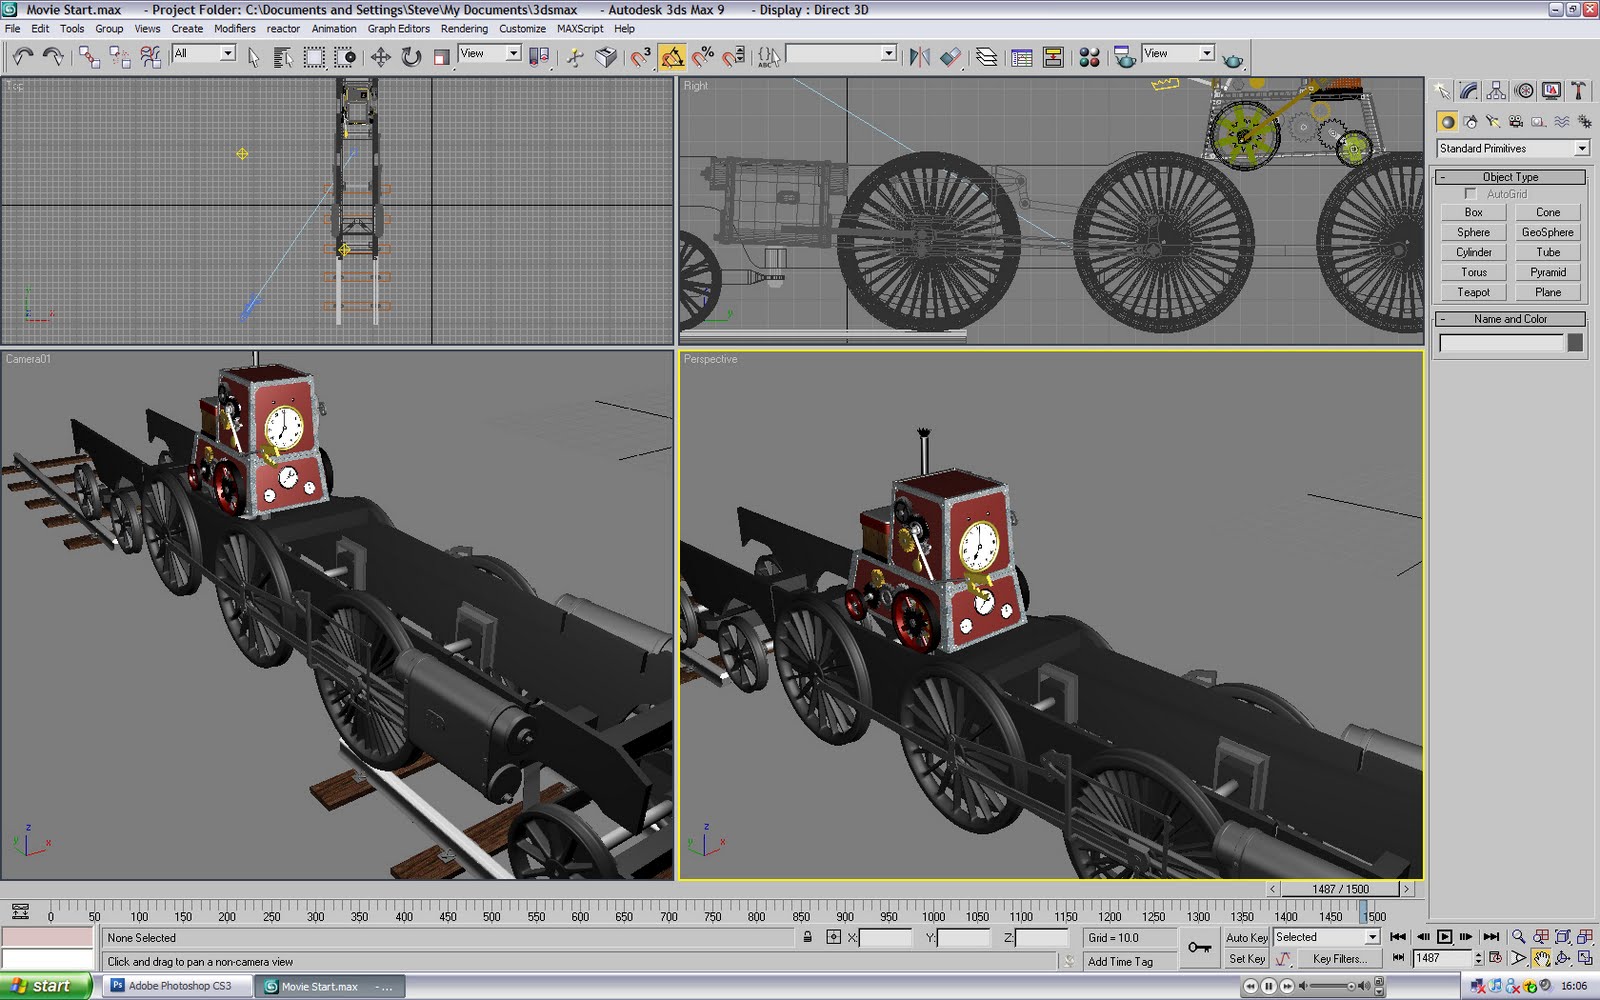
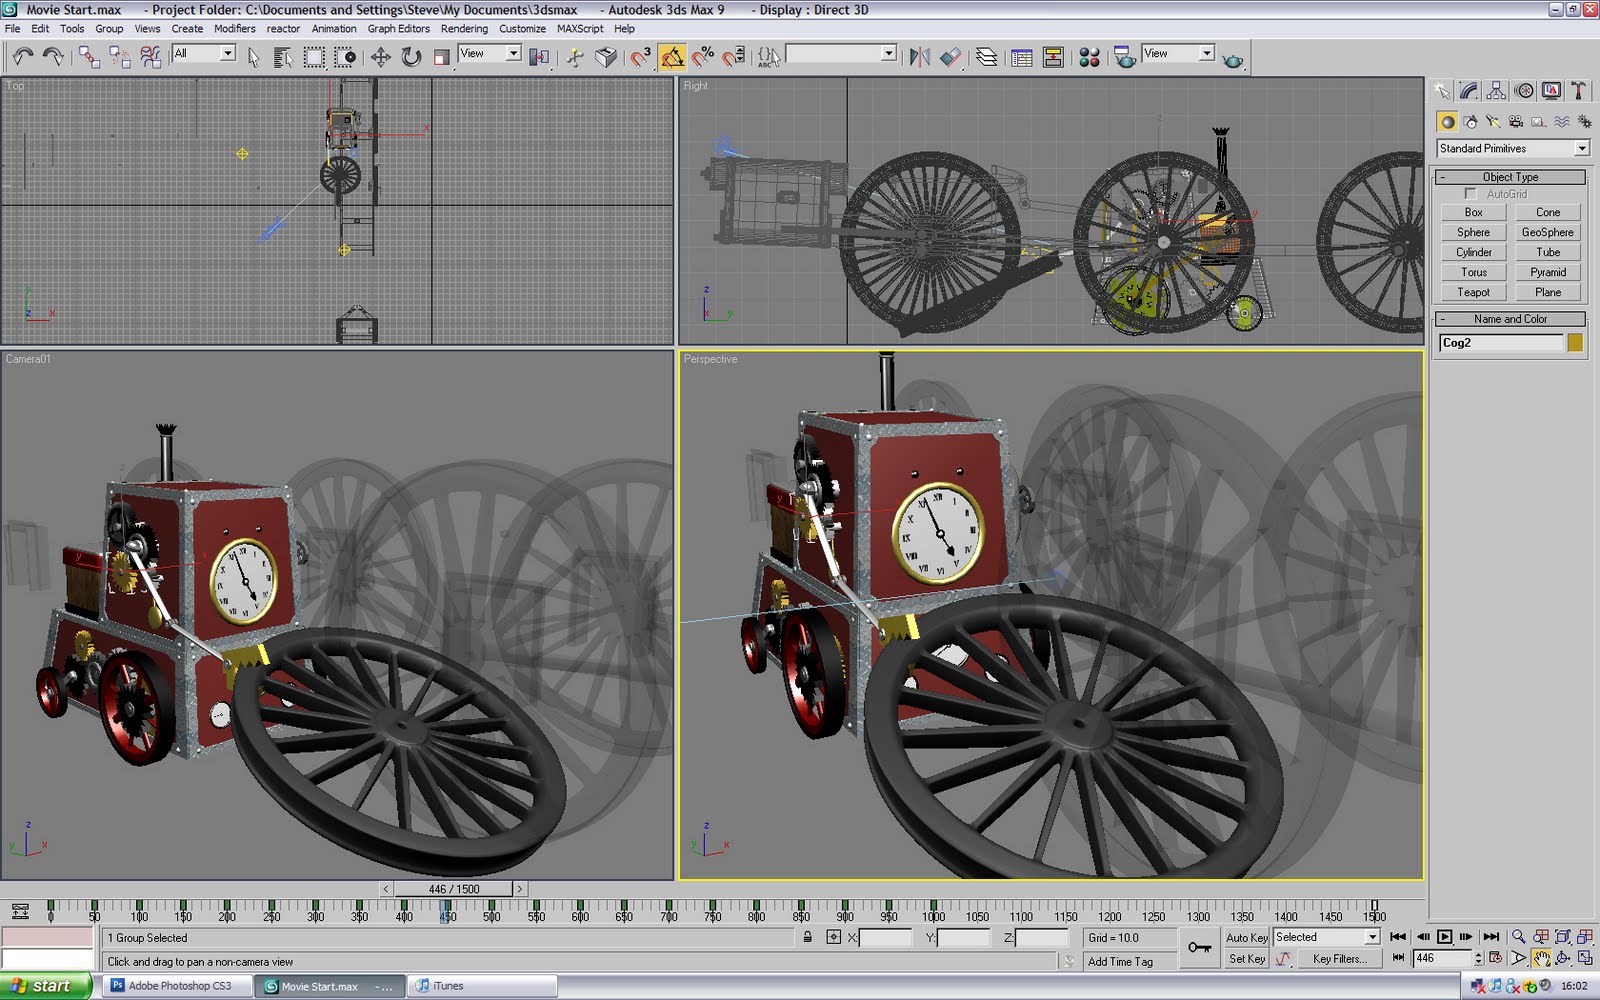
As for the twins... well... the train renders say it all! They look like they've been taken straight out of the Museum of Power... and they haven't even been boosted with enhancements like Ray-Tracer! I said this before and I'll say it again, their eye for detail and strict attention to every little bolt and scratch are exceptional. It was a pleasure to work with them. I was able to work on my tasks without worrying whether theirs would be up to scratch... in fact I actually put in more work in the hope of meeting their level! Whilst the high level of detail did backfire slightly and create some problems later on, the additional hassle was honestly worth the superb outcome.


As for me, I think that I've been able to maintain my side of things and keep my work on par with the high standards set by my group. I'm very happy with the train's construction (I admit, I'm quite proud of how well the flying-parts worked out), but feel that I could have spent a little bit more time working on the movements of the passengers, so that they had a lot more 'character' to them.


Overall, the module has actually been pretty fun, considering how intense it's been. I was fortunate to be able to spend most of the group animating (Which I prefer a lot more to modelling), and was also pleased to be able to work with a character (I really enjoy the animation of characters and even trying to add a personality to them). The group was kept well organised, which meant that it easy to keep on top of things and not worry too much about deadlines or experience difficulties trying to contact other members.


To be honest, the only real difficulties of the project were the recent technical ones. To be fair, this was largely out of our control, and less of a problem with the group organisation or people not pulling their weight. Luckily, these problems only hindered us for a few days, and we were able to overcome them.


All that's left now is to patch the video and add my bassy voice to the clip. I'm really looking forward to the final presentation and honestly feel that we have created an incredible piece of work.


Well done Many thanks guys, it has been a pleasure!

Week 11 - How Rob became the Champion of MeshSmooth

The animation was finished... but the technical troubles hadn't. When it came to rendering the video, my computer threw and tantrum and complained repeatedly about the mapping and the number of faces in the scene. For the time being, and to have a result to show the group, I was able to get away with rendering at 720 x 480. It was a lot smaller than we would have liked (Not even half!) but it was sufficient to show the others where I had got to.


We were in luck though. Rob's computer far superceded all of ours, so we agreed to see if his computer would be able to handle the pressure. We all transferred our documents over and waited with trepidation. Luckily, our prayers were answered at 22:11 Thursday night, as we received a message saying that a few test shots had been successfully rendered at 1280x1024. The following morning, a full-sized render had now been completed. At that moment, Rob was crowned the Champion of MeshSmooth (MeshSmooth being the main culprit of the majority of the technical problems thrown up).


With the my side of the animation now completed, the only phase left is to put everything together and add in the sound. I was nominated as the voice of the narrator, and a basic rendition was recorded earlier today. So aside from the small tasks and odd jobs to help polish everything off, my work here is done

Week 10 - Animation - Part E - The Final Section

With the team of SteamBot's created and ready to go, I was in a position to complete the final section of the animation. The Harwood twins had also completed their superb and highly detailed train model by this time, providing all the finished components required. Unfortunately, we hit severe delays with several technical faults during the exchange of models. Unfortunately, the high-quality train model proved too much for mine and Lee's machines! We had repeated attempts and re-hashes of the model, some of which refused to render, lost it textures or even just refused to open. After a few failed attempts, we managed to get a few working models going, albeit slowly. Luckily, my computer was built to take punishment, so I was able to make do with the larger model (Unusually, the smaller files actually created more crashes). It was a slower process and required me to use a single window to prevent my computer running out of memory... but we managed to get by. Additionally, I found that 3DS MAx would have a stronger chance of coping if the unused sections were hidden during construction. It was considerably slower and more fiddly than I would have liked, but we at least were able to make progress nonetheless. Fortunately, my interactions with the train and carriages were minimal, and did not require large amounts of work.

The first order of business was to update the undercarriage model. Since it's last implementation, it had seen several tweaks and adjustments. Fortunately, the undercarriage was moved as a whole, and had an exceptionally simple movement (3 Key frames)... thus, all I had to do was copy the movements of the older model, and then delete it. Within a few minutes, the improved undercarriage had slotted perfectly within the old animation. The only additional tweak required was that SteamBot had to be moved back a bit further so that it comfortably sat on the floor of the cabin. The camera was also nudged upwards slightly to compensate for this, and to place more of a focus on the top of the undercarriage, which would be seeing the imminent arrival of...


The Boiler and Engine Chassis! The screenshot here really doesn't do justice to the awesome finished model. Some screenshots are on the main blog. If you haven't seen it already, then I'd recommend you do so! Fortunately, the chassis was perfectly constructed so that it was able to fall as a single object onto the undercarriage. It could be grouped and moved as one. Because the chassis acts more as a 'frame' than an actual working component of the train, it seemed best not to focus too heavily on this and have effects like separate pieces flying in. That said, when sorting the camera work out, I was compelled to zoom into the little plaque on the side of the train before skipping to the next part of the animation. As I said before, the attention to detail was fantastic... they went so far that they included the exact plaque of the mode!

So the next phase was to bring in the carriage that would hold the passengers in the animation. With the front of the train complete, the first step was to 'hide' it so that it wouldn't pointlessly eat away at my processor (Aside from a few moments when I needed the model to align the carriage perfectly to it). The tracks were brought up behind the model, and the carriage wheels rolled in. Much like the chassis, the workings of the carriage were a lot less important, so there wasn't a great need for much attention to be brought to the intricacies of it.

The floor and undercarriage were then dropped in from above. Again, it was a simple and relatively straightforward motion.

The tricky bit then came from animating the 4 passengers. It was a fiddly process and wasn't entirely helped by the fact that I hadn't quite grouped and attached everything correctly, which threw up a few difficulties during animating. Sadly, I hadn't grouped all of the new additions to the models, which made them unresponsive to some animations and awkward in others. Nonetheless, I'd already created the falling animations by this time, so I decided to press on, rather than attempt to re-tweak everything.

Luckily, the fact that they weren't going to have a large amount of focus placed on them meant that I was able to skip some of the unnecessary details of their animations. All of the smaller additions required in the basic steamBot model (Moving dials/clock handles, spinning cogs etc) were left out, as their effects would be too minimal to justify the animation. We were working to a deadline and I needed to get a finished render ASAP. However, the reduced smaller details meant that they needed to be compensated by more 'eye-catching' motions elsewhere. The original SteamBot model needed the smaller details because it was so close to the screen and had moments with little action where the audience's attention might drift and notice their absence. However, as there were 4 models, each with their own unique features and details to distract the attention, I only needed a few eye-catchers to compensate for the lack of smaller movements.

The most obvious answer was to throw off one of the bot's hats as they landed. The ProfBot was chosen for this task. So as he landed, the hat was thrown off and spun in the air, only to be caught by the smaller kidBot, who would proceed to hand the hat back to ProfBot. Unfortunately, the positioning of the characters meant that I was unable to properly have the professor pick up the hat and place it back on his head. Luckily, I was able to arrange a quick compromise: The Professor would flip the hat instead. As the KidBot held out the mortarboard, the professor would proceed to flip the hat back on his head. The advantage here was that this motion had a lot more power to it, and would again help compensate for the lack of small details.

The animation between the Gent and Boiler Bots were pretty simple too. The BoilerBot tipped his hat to the Gent, and in return the Gent returned with a curt nod (Well... leaning forward, as the bots don't exactly have necks!). The graphics of these were interesting enough to not require a lot of motion. To be honest, these robots are more eye-candy for the viewers, so they didn't exactly need a lot of focus to be placed on them. They basically needed to appear for the narrator to comment on who they were and how the trains by this time were available to everyone.

The final step was to simply have the carriage chassis to fall down onto the undercarriage. The movement here was essentially the same as the engine chassis

I finished the animation by scrolling the camera down the train so that it pointed to the front. Personally, this seemed like a nice angle to prepare for the initiation of the movement. It would be from here, that the video will cut to Lee's animation of the train's movement, where the motion and specific movements of the train could be observed and demonstrated in detail.

Monday 23 November 2009

SteamTeam - ShowReel

And so, presenting the DreamSteamTeam!
SteamBot - (Main character for the animation)

GentBot


BoilerBot

ProfBot

KidBot

Famous 5, eat your heart out

Friday 20 November 2009

Passengers - BoilerBot

The last, and perhaps trickiest addition was the BoilerBot: AKA. The Coal Worker. The idea was to give this one overalls and the old fashioned cap. However, the overalls were a lot trickier to pull off than I first envisaged. Not only was it hard to make the shape, it was also a lot harder to make the overalls fit snugly around BoilerBot's body. The texture didn't even work very well either. After a few failed attempts, it seemed more constructive to try for something a bit simpler!

The first step was to give BoilerBot a more 'dirty' colour scheme. Opening photoshop, I took a dark, earthy green, and smeared black smudges all over it, creating a nice 'coal' effect. The trim was also made lighter and more prominent (Giving more of an impression of something like steel)

Next up was to try and build the flat-cap most coal workers wore. I started off with a simple cube on top of the head, and spent a good 5 minutes playing around with the 'editable poly' tool. The 'Soft Selection' option helped greatly here too.

The main cap was finished off with a blast of 'turbosmooth' and given a denim texture to it (Stolen from the failed texture I used on the overalls).

The 'stripe' to the cap was made from a chopped-up sphere. A combination of the hemisphere and "Slice from / to" helped to cut the sphere down to a single, rounded wedge. It was finished off with a bit of 'edit poly' to pull some of the vertexes out to cover the cap properly.

The final stage of the cap was simply to add the bill. This was made from a heavily-flattened sphere (Thanks to the humble 'scale tool'), and in 'editable poly' mode, the centre was raised up slightly, to create an overall bend. And with that, BoilerBot was finished! (For now anyway...)

Passengers - KidBot

Scratching my head for more ideas, I stumbled across a good one: KidBot! The locomotives at this time were available for public use, so children would often travel for days out with their parents. Creating a KidBot was therefore another good addition to the SteamTeam. It was pretty easy to pull off too. The first step was choosing a cute colour scheme (I tried polka dot, but the chocolate brown worked a lot better). All I did then was remove the clock, enlarge the eyes, and change the 'Claw' so that instead of having teeth, it was more of a grabber.

Aww, isn't it cute!

Passengers - ProfBot

The next passenger on the train was to be the humble University Scholar / Professor. And so, ProfBot was born. I started off with a nice royal blue colour scheme. It's a rich, smart colour, which suited the role of professor nicely.

So to begin with: I made the spectacles. The first step was to make a pair of cylinders and use the built-in "Slice from/to" options to chop them into semi-circles.

The rims were built from a trio of tori (Plural of 'Torus'), all hit with the "Slice to / from" tool. A pair of half-tori built the frame, and a smaller segment of one created the bridge. At this point, I left the model for a while. Whilst I wanted to add a beard, I realised that the hair/fur modifier would eat up far too much processor to be of any real use. However, a brainwave hit me the next day:
Starting with a basic sphere, I reacquainted myself with the humble 'Editable Poly' tool to drag out the points of the sphere to make more of a tear-drop shape. With a light flick at the end, and playing around with the 'scale' tool to flatten it, we had ourselves a whisker
Duplicate and mirror created a full moustache. Ideally, ProfBot would have had a goatee aswell, but I had trouble with that, and it never came out how I wanted. So I left it just at the 'tache.

The finishing touch was the all-important mortar-board. A pretty easy creation as you can probably tell... 1 sphere and a rectangle on top. Simple additions, but now we have a fully functional ProfBot!

Passengers - GentBot

The most obvious "SteamBot Cousin" was the one sketched back at the start of the project: A Gentleman SteamBot! Clad in a top hat and monocle, the GentBot would represent the upper classes using the locomotives.

The first step was to create a nice colour scheme for the GentBot, and a nice royal green suited it nicely. It was also given a fancy golden / bronze trim, instead of the metallic silver of the original. This gave the new Bot a little bit more 'style' compared to its counterparts.

The monocle was a nice and easy addition. A torus with a flat cylinder for the centre. The texture of the cylinder was given a high specular level with opacity at around 5%, giving the perfect impression of glass. The string leading from the monocle was a combination of the 'Helix' Line tool, with the 'Loft' Compound Primitive, using a circle as the base. (If you've forgotten how to do it: create a 'Helix' line, and place a circular one at the tip. Then, under the 'compound primitives', you will find 'loft'. Select the circle, to act as the shape, and then select "set Path". Click the helix and it will use the line as the path: Creating a tube). With the tube, all I had to do was shrink the circle and play with the scale tool until I was happy.

The hat was an incredibly easy addition. I created a cylinder, and in the 'Edit Poly' Mode, lifted up all of the vertices on the outside of the hat to create the base: And the top was merely a large, upside-down cone.

Another shorter cone created the band around the base of the top hat. It was nearly done... but something was missing...

Bingo! What is a gent without the long, twiddly moustache? The loft tool once again saved the day. I started with a basic line tool, and curved it around into the little loop on the tips. Add the loft and it was pretty much done. I created a single half of the 'tache with this, and simply duplicated and flipped it around. And there we have it: A distinguished looking SteamBot!

Week 9 - A Re-Think

In our meeting last Thursday, we were discussing out ideas about where to take the animation. We had a nice idea, but the critique that continually appeared was that we lacked a suitable demonstration of HOW and WHEN the train was used. Incorporating things like scenery and a Train station seemed to be so much work that we risked overstepping our realistic abilities within the current time frame.
However, locked in our 10 minute meeting, we came up with an interesting idea...
Whilst Steve Harwood took care of finishing the chassis of the train, Rob would take charge of creating the carriages (They can recycle the elements of the undercarriage, and the overall shape is a lot less complicated than the main train). What would happen is that the undercarriage of the carriage would roll in, and several "Period-Costume-Clad SteamBots" would all fall in. The narrator could then remark "Oh look SteamBot! It appears that you have some passengers!" and go on to explain who they are, what they would have used the train for... etc etc. It solved our problem of going over the how's and why's, and also gave me something fun to crack on with!
Result

Animation - Part D - The Undercarriage

The final bit of the animation used similar principles to the "flying parts" section. Before the bulk of the undercarriage flew in, all the other sections spread out to make room for the model. Luckily, because the sections would move back into the exact same positions after, I keyframed them moving outward: which created 2 keys (1 for the starting point, and another for the finishing point where they're mode spread out) and simple duplicated the first key (Click and drag whilst holding shift). This meant that they move out, then move back in to the same starting space. Of course, I also needed to duplicate the second frame, to create a "pause" after the pieces spread. So the keyframes were:
1. Starting Point
2. End point (Pieces move out)
3. End point (Pieces stay out)
4. Starting Point (Pieces move back in)

From this bit, all I needed to do was bring the bulk of the undercarriage up from below (using the same process outlined in Part C). The only difference this time was that it worked better if the undercarriage "overshot" and flew too high before going back down into its correct position. It looked better and allowed me to "throw" SteamBot into the air. Another key thing about animaiton is ENERGY. I could have just had the undercarriage lift and push SteamBot into position... but throwing him in the air packs a lot more of a visual impact.

The final step of the animation (So far at least...) was the have the train tracks fly in. I'll give you 3 guesses how I went about doing that one!

And there we have it! The details and tricks used to make the beginning of the animation. Hope some of the tips are useful!

Animation - Part C - Flying Parts

The flying parts of the animation are the most elegant. They look exceptionally difficult and flashy... but were perhaps the easiest section to do. A few sneaky tricks allowed me to have a ton of little pieces and segments effortlessly fly into their exact position... and not a pixel out. So how did I pull this off? Read on

The first thing that the eagle-eyed readers of this blog would have spotted was the fact that the screenshots have translucent wheels in the scene next to SteamBot. On rendering, these wheels are actually completely invisible (Right Click -> Object Properties -> Visibility -> Set to 0). In fact, most of the undercarriage is invisible. I merged the entire undercarriage model with this one, and set its visibility down to 0.

The animaiton of the flying pieces is basically a very clever process (If I do say so myself). The secret is that I simply worked backwards.

You see, having the finished model meant that all the pieces were in the correct place. All that I needed was to have the pieces flying in from far away. So instead of starting with a piece a long way away, and then keyframing it into the scene... I started with the finished model, and keyframed the train part flying AWAY from the scene. Once I had done this, all I had to do was swap the 2 keyframes around (If you haven't tried this, all you have to do is click and drag the keyframes on the timeline to move them). So instead of the animation starting at the centre, and flying out of the scene... the animation now started out of the scene, and flies back to its original starting point in the correct position. Sneaky eh?

The only step to do from this was to stagger all the keyframes and movements to allow the pieces to cascade onto the model. This was merely a simple case of dragging the keyframes around to where they fit best, so that they 'finished' up on the model at different times.

This process was repeated with the entire model. All the wheels, cylinders, axles, extra carriages all flew in from this exact process. Use the original point as the guide, build the keyframes from it: Then swap them around. Repeat until looking awesome

Animation - Part B - The Wheel

The wheel of a train is a large, heavy lump of metal. What does this have to do with the animation? Everything. The wheel is not an airweight piece of plastic, and therefore shouldn't be treated like one. Sure, I could say that the hydraulics in SteamBot's arm are powerful enough to lift the wheel with ease... but where would the fun be in that? Where would the personification and 'human' characteristics come in? Precisely: No where. So SteamBot would either look superhuman or the wheel would look flimsy. Either way, it's not very helpful. So the trick here was to try and mirror the movements and motions of a normal person, and apply them to SteamBot

So how do you prop up a heavy wheel? It's too heavy to just flip on its side in a single movement. In fact it'd be probably be so heavy that you couldn't lift it cleanly. My guess, much like handling any other heavy object: Is that you get your hands beneath it, and start to lift it to the point where you can quickly lift it and put your weight beneath it. From here, you can lift the full weight with your entire body (Not just your arms / back). Thus, the same principle applied here! The first step was therefore to have SteamBot lifting the wheel before it could put its weight behind it. So we started with it gripping the edge and starting to lift, but as it does you, you will see that it wraps its claw around, so that it has a more secure grip.

Next step is to put your weight behind it. Because it was too large and SteamBot is not able to crouch down, the best way of tackling this was to have SteamBot quickly 'throw' the wheel up, creating a sufficient gap to roll in and put its weight behind it. This bit was pretty easy, as I just had to fling SteamBot's arm up and move it forward. The trick bit was moving the wheel. The movement had to give off the impression that the wheel was exceptionally heavy (Rather than drifting in air and softly gliding back down), and so it had to move slightly, and immediately fly down with a lot of force.

The final bit was the easiest. With its weight now behind the wheel, SteamBot only had to trundle forward and straighten its arm. Providing it was made slow enough, so that the wheel still looked like it carried a lot of weight, the animation was pretty simple.

Animation - Part A - Moving SteamBot

First up, how did I do SteamBot's movements? The movement of SteamBot was a little bit more intricate than I first predicted it to be. The original plan was to simply move the wheels, and then push the chassis along. However, this created a very 'static' effect of movement. It was very linear, with no sense of realism to it. It was flat and particularly underwhelming to say the least... not exactly what I wanted to portray! I then remembered back to when I created DiscoverBot in Year 2, and how the little details and movements added the largest sense of realism to the animation. Fortunately, the same applied here. The key element to the animation was the lurching / rocking of SteamBot. This worked particularly well when SteamBot would stop and start moving. It gave the effect of momentum, which helped to add a stronger sense of realism. In addition, the rocking motion helped to give SteamBot a more 'rugged' edge, as opposed to being a perfectly stabilised model.
Of course, the wheels and the chassis weren't the only components of SteamBot. There were a ton of cogs on the right hand side, and the Steam-Pump on the left. There were also a ton of dials and gauges, not to mention the all-important arm! The arm in pariticular needed to have a personality (An odd thing to say). The fact that SteamBot's eyes and top-section were static meant that it was difficult to put across any emotion from them. The personality of SteamBot had to come directly from its movements and the arm. As a result, the arm would swing as if SteamBot was taking a casual stroll, and wave about opening and closing when in a state of panic. It's very subtle and, to be honest, probably not noticable, but it adds a strong sense of personality and character.

Now, there was a lot to move! It was made easier by being built up in stages, where each new element would be incorporated into the entire film, before the next one was made. The 2 bare essentials were the arm and the chassis movement. Everything else is eye candy. So I started with the basic movement (Not even rocking) and letting the arm move and grab the essential things. From here, I added more rocking and lurching and arm flailing. After this, I was able to rotate the wheels to mirror the movements, and work in the cog and pendulum movements too.
The key thing here is that realism comes from subtle motions. The small, intricate movements are what separates a stale animation from a stronger one. If anyone finds that their animation seems to be very lackluster and lacks that "edge"... try adding a few more smaller movements to other areas. I mean, a good example is a classic 'Walk Cycle'. Almost the entire body moves/bobs/rotates to create this. Don't be afraid to exaggerrate movements either.

Sunday 15 November 2009

Week 8 - Creating the Animation

And here it is... the most recent render to date. This is the initial animation of the humble SteamBot introducing the Locomotive. There is still more to add as more of the model is completed, and as each section comes into play, the video here will be extended until it meets up with where Lee's part of the animaiton begins. So I present to you SteamBot and the Train Wheel: Batteries not included

So how did I make such a video? The tricks will be revealed over the next set of posts!

Saturday 7 November 2009

SteamBot - Now with added texture!

Texturing SteamBot was a fairly simple process. I did not need any specialist textures (All the small details like dials had been taken care of... although a clockface might he handy for the front!) It was pretty much a case of trying out different colours and specular levels on each surface. The hardest bit was the main colour scheme. Though 'robotic', a dull grey would not work very well for an 'Industrial' robot. I tried blends of yellow/gold/bronze, taking some ideas from the SteamPunk subculture... but none of them seemed to have the right 'look' (And finding suitable textures for such materials were also harder than I expected). In the end, I settled upon this deep burgandy. It had a rich colour and contrasted well with a darker trim, whilst being bright enough to stand out amongst the train detail (without standing out too much). The mottled effect (also found on the gears) was attined by applying a 'bump map' modifier with the 'noise' map (Blotches of black and white), which seemed to work well to create a 'dirty/worn' look.
The wheels were given an incredibly rich burgandy colour (An idea taken from a few more images from the Musuem of Power), and really seem to work well. So well that I'm considering whether the polished, fresh, rich colour of them would work just as well for the main body of SteamBot. Testing is currently in progress...
Other than those 2... everything else was pretty much kept as the same colour as seen in the model, only they were given polished/rough textures to bolster the colour and prevent them looking too 'plain'. This is by no means the final, be-all-and-end-all result, but is pretty much what I'm shooting for. There might be a few additions/changes in the near future, depending on feedback and a bit more playing around with colours.


And here it is! The finished model of SteamBot! All textured and ready to go! *sniff* They grow up so fast...

Wednesday 4 November 2009

SteamBot - Finished Model

It stills needs texturing (Which will be discussed tomorrow when the group have another meeting), but here is the finished model of SteamBot!